Building a 2D Game with HTML5 and JavaScript
Create Your Own Game from Scratch
January 29, 2025
Hey there, fellow developers! Today, I'm super excited to share how I built a fun 2D game using just HTML5 Canvas and Vanilla JavaScript. It's actually part of my Pomodoro app, PomoFox, where users can play during their breaks. Think Flappy Bird, but with a cute fox avoiding tomato soldiers!
Whether you're new to game development or looking to enhance your skills, this tutorial will walk you through creating an engaging browser-based game from scratch. We'll cover everything from basic setup to advanced features like collision detection and parallax scrolling.
What We're Building
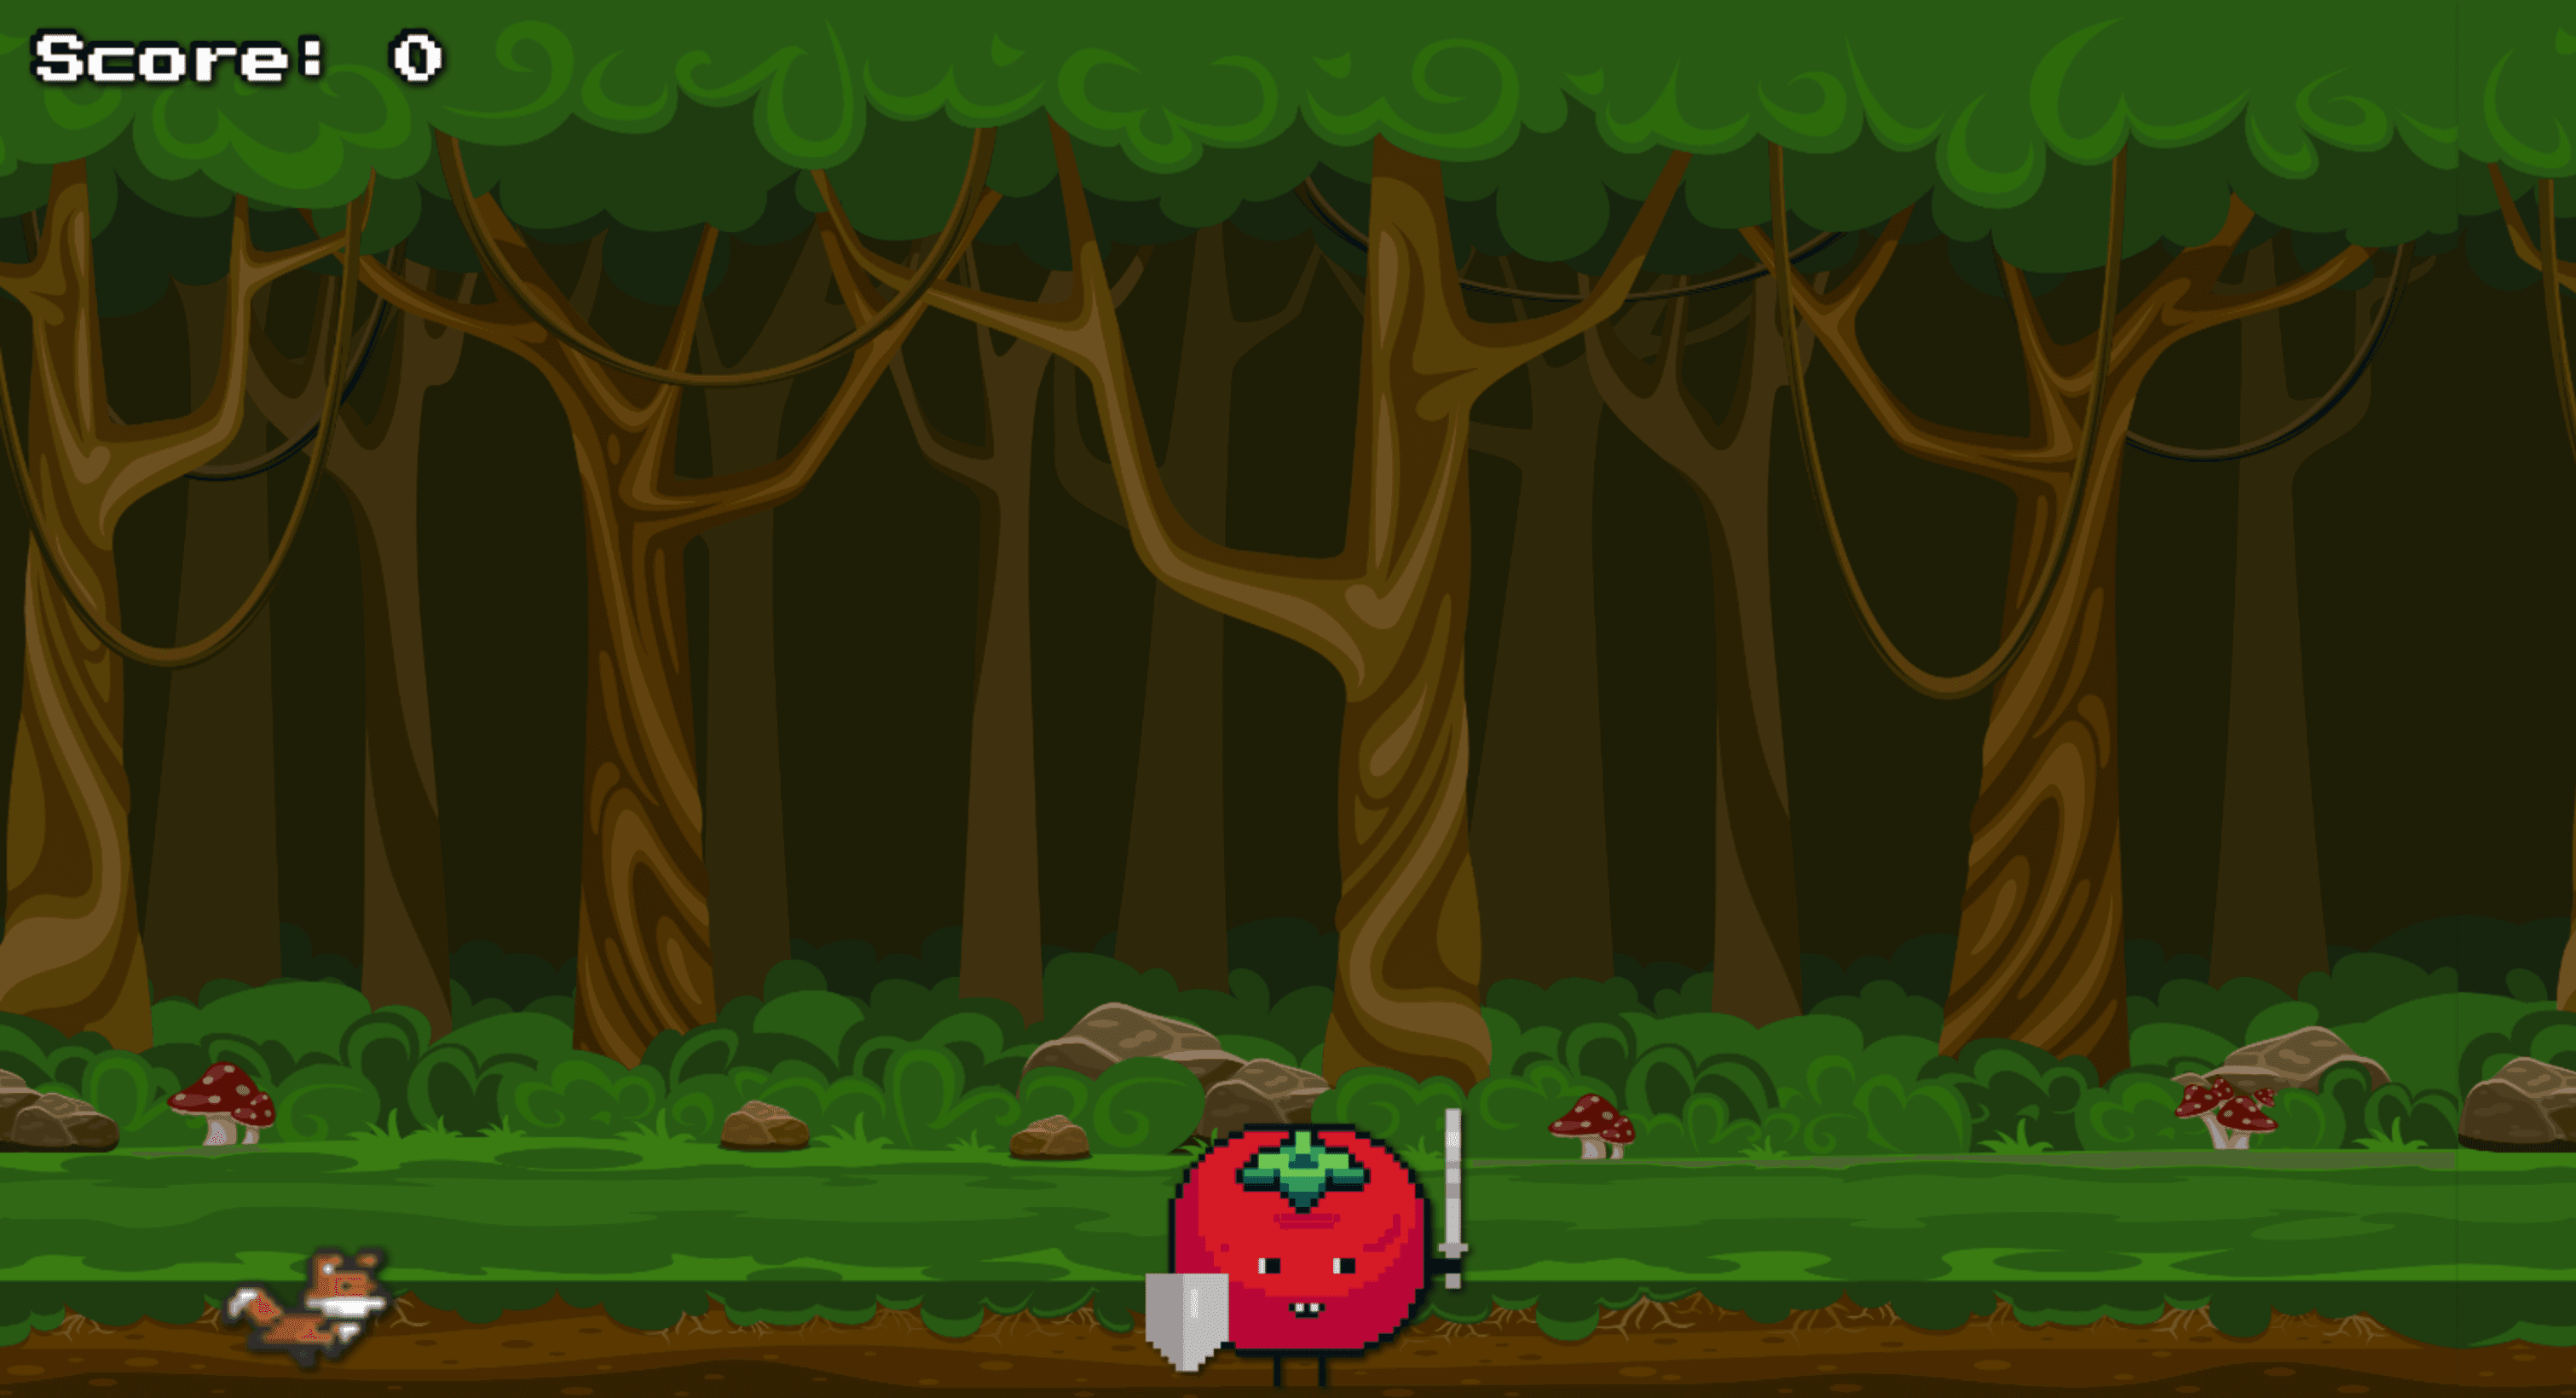
Fox Runner is a simple yet addictive game where you control a running fox that needs to jump over tomato soldiers. The longer you survive, the higher your score gets. The game features:
- A pixel-art style fox character that can jump
- Tomato soldiers as obstacles
- A scrolling background
- Score tracking
- Game over state with restart option
- A countdown timer before starting
Setting Up the Project
First, let's set up our basic HTML structure. We need a canvas element for our game and some images for our sprites:
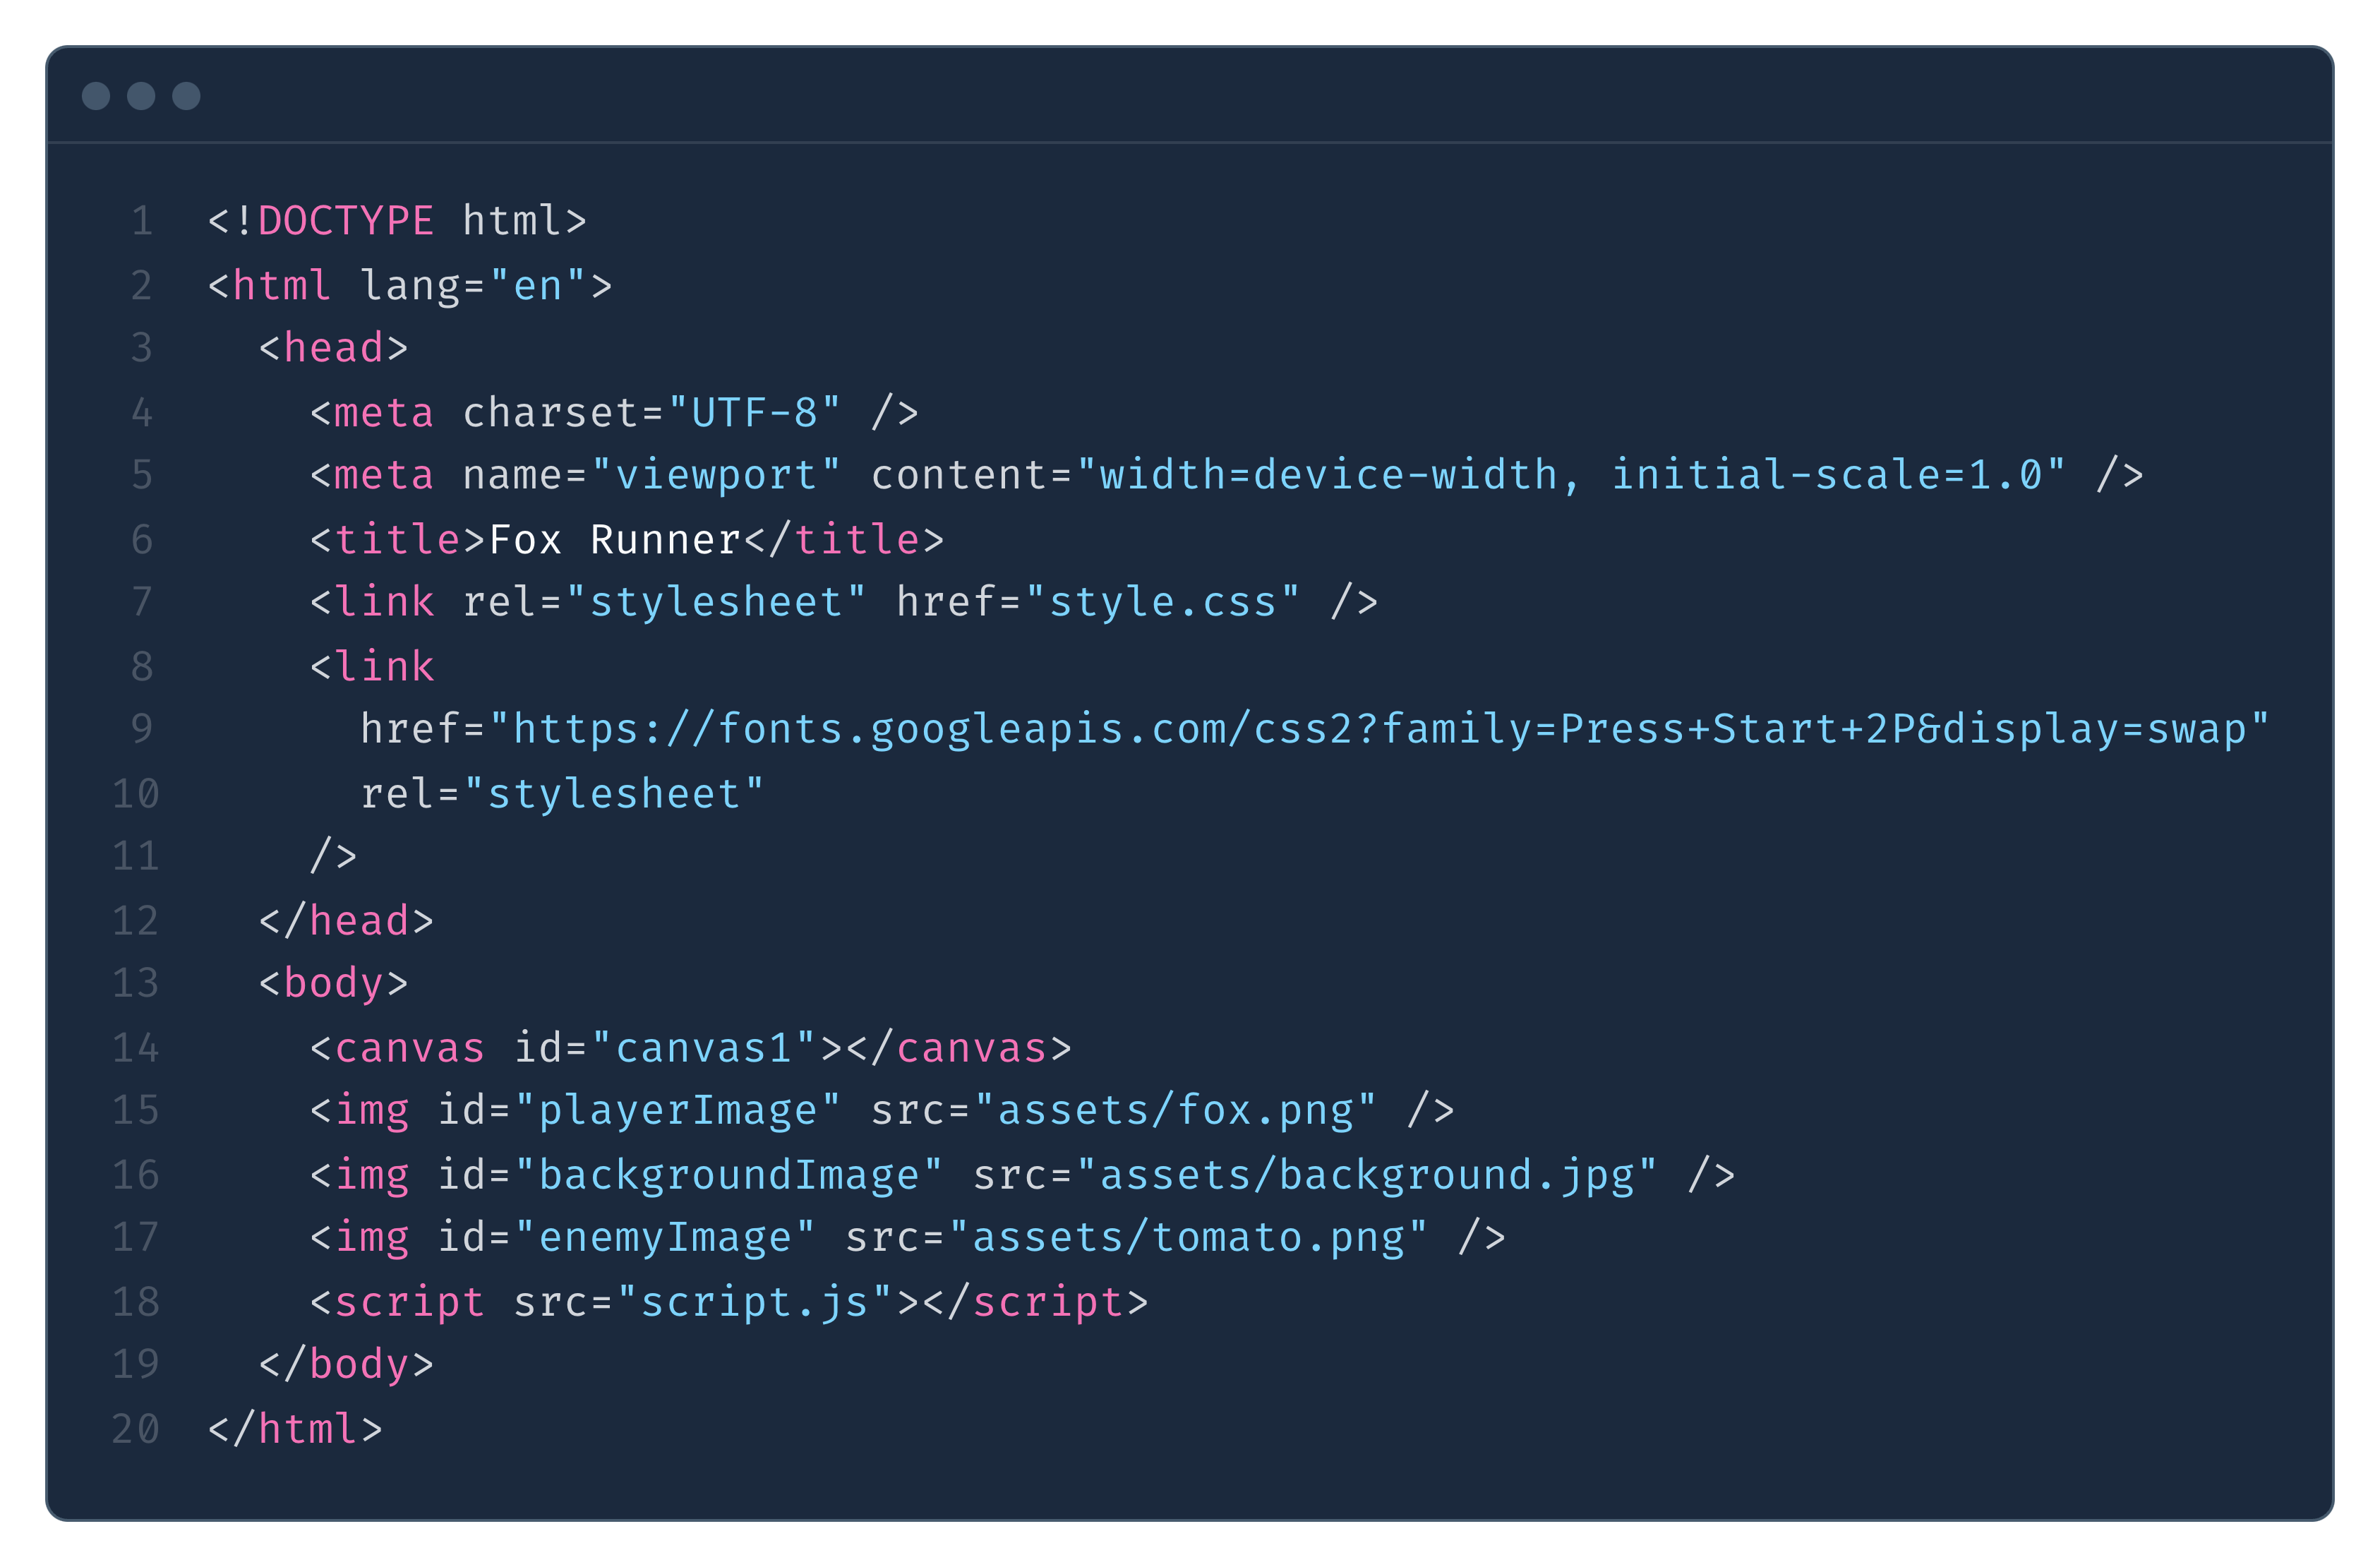
In our HTML, we're loading three important images:
- fox.png: Our main character sprite sheet
- background.jpg: The scrolling background
- tomato.png: The enemy sprite These images are hidden with CSS but will be used to draw on our canvas.
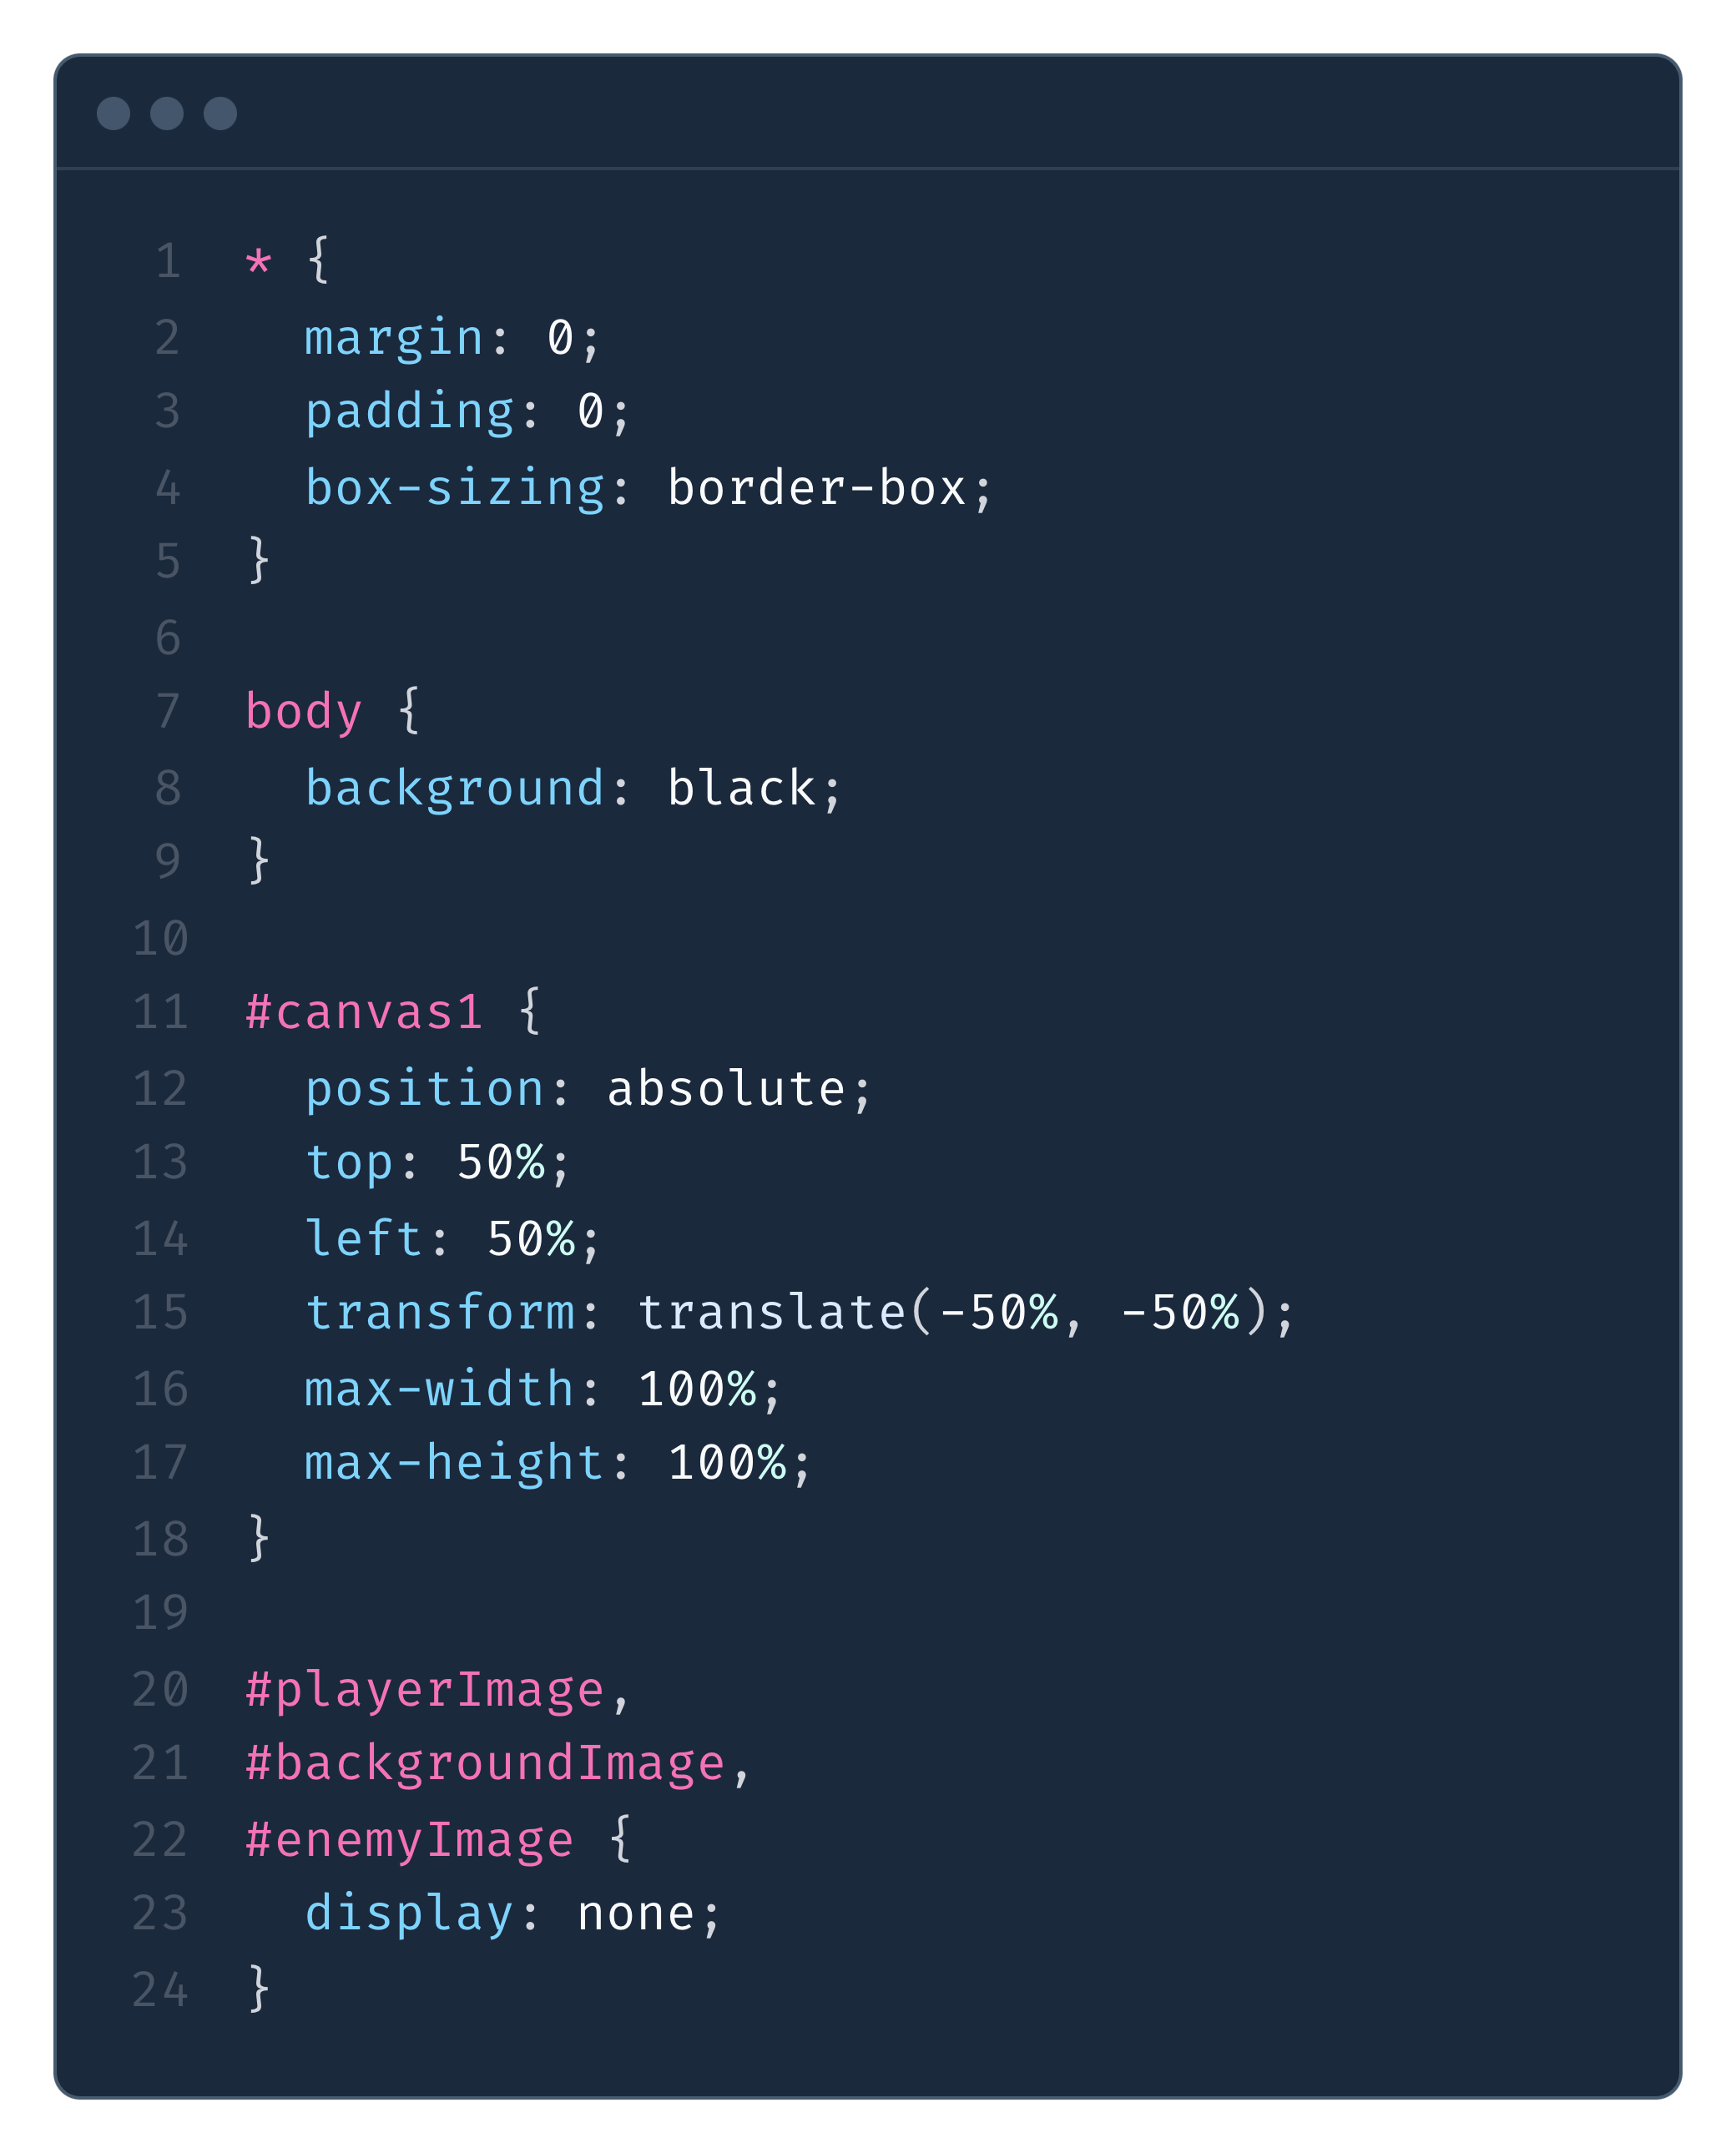
For the styling, we'll keep it simple with this CSS:
The Game Logic
Now for the fun part - the JavaScript! Let's break down each component and understand how it works:
1. Setting Up the Canvas
First, we set up our canvas and get it ready for drawing:
window.addEventListener("load", function () {
  const canvas = document.getElementById("canvas1");
  const ctx = canvas.getContext("2d", { alpha: false });

  const GAME_WIDTH = window.innerWidth;
  const GAME_HEIGHT = window.innerHeight;
  canvas.width = GAME_WIDTH;
  canvas.height = GAME_HEIGHT;
});
This code waits for all assets to load before starting the game and sets up our canvas to match the window dimensions.
2. InputHandler 🎮
class InputHandler {
    constructor() {
      this.keys = new Set();

      // Register keydown event to track ArrowUp and Enter keys
      this.handleKeyDown = (e) => {
        if (e.key === "ArrowUp") {
          e.preventDefault(); // Prevent page scrolling
          this.keys.add(e.key);
        } else if (e.key === "Enter" && gameOver) {
          restartGame(); // Restart game if Enter is pressed after game over
        }
      };

      // Register keyup event to stop tracking ArrowUp key
      this.handleKeyUp = (e) => {
        if (e.key === "ArrowUp") {
          this.keys.delete(e.key);
        }
      };

      window.addEventListener("keydown", this.handleKeyDown);
      window.addEventListener("keyup", this.handleKeyUp);
    }

    // Cleanup event listeners when no longer needed
    cleanup() {
      window.removeEventListener("keydown", this.handleKeyDown);
      window.removeEventListener("keyup", this.handleKeyUp);
    }

}
This class manages keyboard input for a game, specifically tracking the ArrowUp key for movement and Enter key for game restart functionality.
- We use a Set to store currently pressed keys, which is an efficient way to track active keyboard inputs without duplicates.
- When the ArrowUp key is pressed, the code prevents the default page scrolling behavior and adds the key to the tracking set. When released, it's removed from the set.
- The Enter key is specifically handled to restart the game, but only when gameOver is true.
3. The Player 🦊
class Player {
    constructor(gameWidth, gameHeight) {
        this.gameWidth = gameWidth;
        this.gameHeight = gameHeight;
        this.scale = 5;
        this.spriteWidth = 32;
        this.spriteHeight = 33;
        this.width = this.spriteWidth * this.scale;
        this.height = this.spriteHeight * this.scale;
        this.x = 100;
        this.y = this.gameHeight - this.height;
        this.image = document.getElementById("playerImage");
        this.frameX = 0;
        this.frameY = 2;
        this.maxFrame = 7;
        this.fps = 20;
        this.frameTimer = 0;
        this.frameInterval = 1000 / this.fps;
        this.vy = 0;
        this.weight = 1;
    }

    jump() {
        if (this.onGround()) {
            this.vy = -32; // Initial jump velocity
        }
    }

    update() {
        // Apply gravity
        if (!this.onGround()) {
            this.vy += this.weight;
            this.y += this.vy;
        } else {
            this.vy = 0;
            this.y = this.gameHeight - this.height;
        }
    }

}
The physics calculations:
- scale = 5: Makes our fox 5 times bigger than the original sprite
- width = 32 * scale: Each frame in our sprite sheet is 32 pixels wide
- vy = -32: When jumping, applies an upward velocity of 32 pixels per frame
- weight = 1: Each frame adds 1 to vertical velocity to simulate gravity
4. The Enemies 🍅
class Enemy {
    constructor(gameWidth, gameHeight) {
        this.gameWidth = gameWidth;
        this.gameHeight = gameHeight;
        this.image = document.getElementById("enemyImage");
        this.scale = 0.2;
        this.width = this.image.width * this.scale;
        this.height = this.image.height * this.scale;
        this.x = this.gameWidth;
        this.y = this.gameHeight - this.height;
        this.speed = 8;
        this.markedForDeletion = false;
    }
    update() {
        this.x -= this.speed; // Move left at constant speed
    }
}
Enemy movement explained:
- Enemies start at the right edge (this.gameWidth)
- Move left at 8 pixels per frame
- Positioned on the ground using gameHeight - height
5. Collision Detection
function checkCollision(enemy) {
    const dx = enemy.x + enemy.width / 2 - (player.x + player.width / 2);
    const dy = enemy.y + enemy.height / 2 - (player.y + player.height / 2);
    const distance = Math.sqrt(dx * dx + dy * dy);
    if (distance < enemy.width / 2 + player.width / 2) {
        return true; // Collision detected
    }
    return false;
}
The collision system uses circle-based detection:
- Calculate horizontal distance between centers (dx)
- Calculate vertical distance between centers (dy)
- Use Pythagorean theorem for actual distance
- Compare with sum of radii to detect collisions
6. The Animation Loop
function animate(timeStamp) {
    const deltaTime = timeStamp - lastTime;
    lastTime = timeStamp;

    ctx.clearRect(0, 0, GAME_WIDTH, GAME_HEIGHT);
    background.draw(ctx);
    player.draw(ctx);

    if (gameStarted && !gameOver) {
        background.update();
        player.update(input, deltaTime, enemies);
        handleEnemies(deltaTime);
    }

    displayStatusText(ctx, canvas);

    if (!gameOver) {
        requestAnimationFrame(animate);
    }

}
The animation loop is crucial::
- deltaTime: Measures time between frames for consistent speed
- clearRect: Cleans the canvas before each frame
- Updates happen only if the game isn't over
- requestAnimationFrame schedules the next frame
7. Enemy Spawning
function handleEnemies(deltaTime) {
    if (enemyTimer > enemyInterval) {
        enemies.push(new Enemy(canvas.width, canvas.height));
        enemyTimer = 0;
        enemyInterval = Math.random() * (ENEMY_SPAWN_MAX - ENEMY_SPAWN_MIN) + ENEMY_SPAWN_MIN;
    } else {
        enemyTimer += deltaTime;
    }
}
The spawning system creates an unpredictable but manageable pattern:
- enemyTimer: Tracks time since last spawn
- enemyInterval: Random time between 500ms and 1500ms
- Ensures consistent challenge without overwhelming the player
8. Parallax Background
class Background {
    constructor(gameWidth, gameHeight) {
        this.gameWidth = gameWidth;
        this.gameHeight = gameHeight;
        this.image = document.getElementById("backgroundImage");
        this.x = 0;
        this.y = 0;
        this.width = gameWidth;
        this.height = gameHeight;
        this.speed = 7;
    }

    update() {
        this.x -= this.speed;
        if (this.x < -this.width) this.x = 0;
    }

}
The parallax effect:
- Moves the background left at 7 pixels per frame
- When the image ends, resets it to create infinite scrolling
- Creates an illusion of movement
Future Enhancements
Consider adding these features to enhance your game. I will also try to improve these in the future:
- Mobile touch controls
- High score system
- Different character skins
- Sound effects and background music
- Power-ups and special abilities
Conclusion
Building games with HTML5 Canvas is super fun and rewarding. This Fox Runner game shows how you can create an engaging game with just a few basic concepts.
Remember, the best way to learn game development is by doing. Start with something simple, then gradually add more features as you get comfortable with the basics.
Happy coding! 🦊🍅
Game: https://game.pomofox.com
Source Code: https://github.com/zibrahimov/fox-runner
This tutorial is part of the PomoFox project. If you enjoyed this, don't forget to check out the PomoFox!